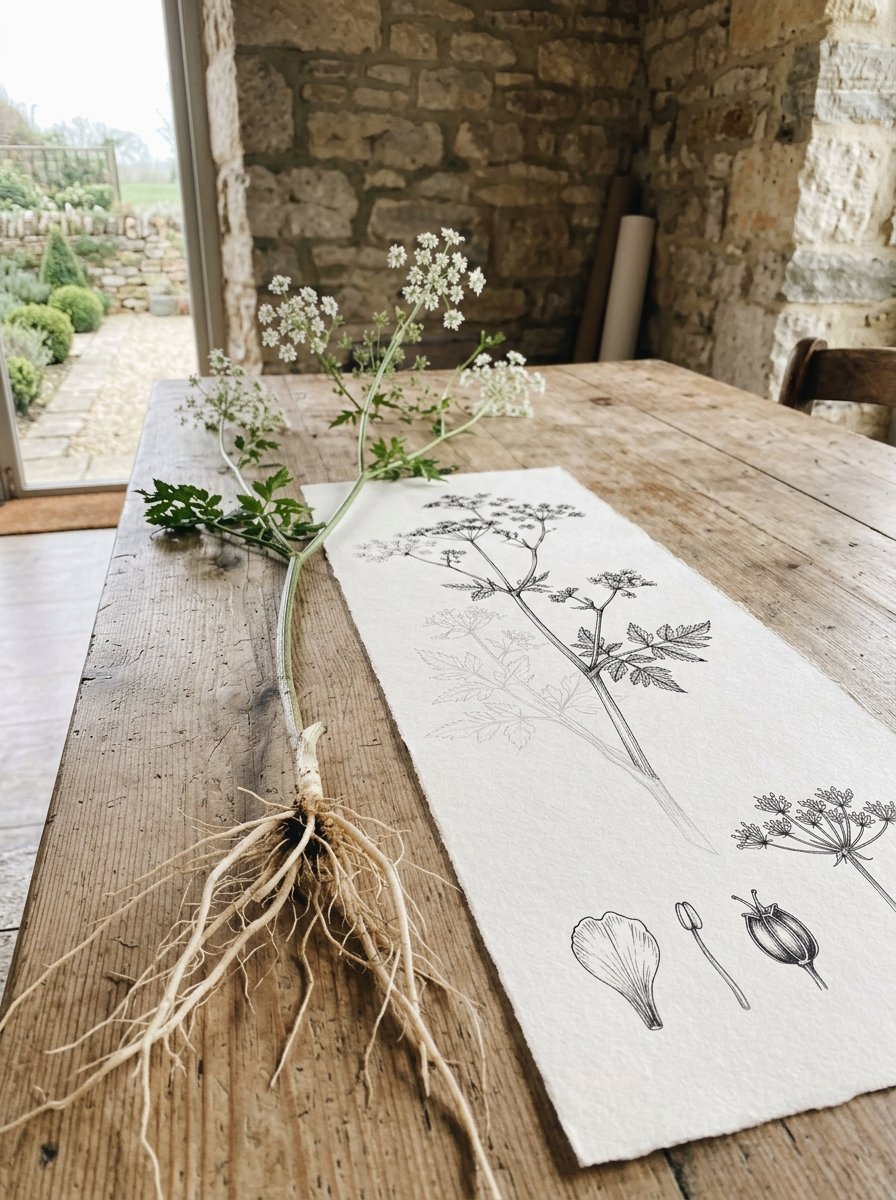
Cut a plant and you are on a clock. Botanical illustration was built around that clock, not around the flower.
The bloom closes. The leaves soften. What you started drawing stops matching what is in front of you.
So the method is an order of work. It decides what goes down first.
That order is the difference between a drawing and a record. A record says which plant this was.
Whole, root to seed. The small parts drawn bigger than life in one corner. A note of true size.
Nothing gets left out because it was hard. (Nobody is asking you to make it charming, which I find a relief.)
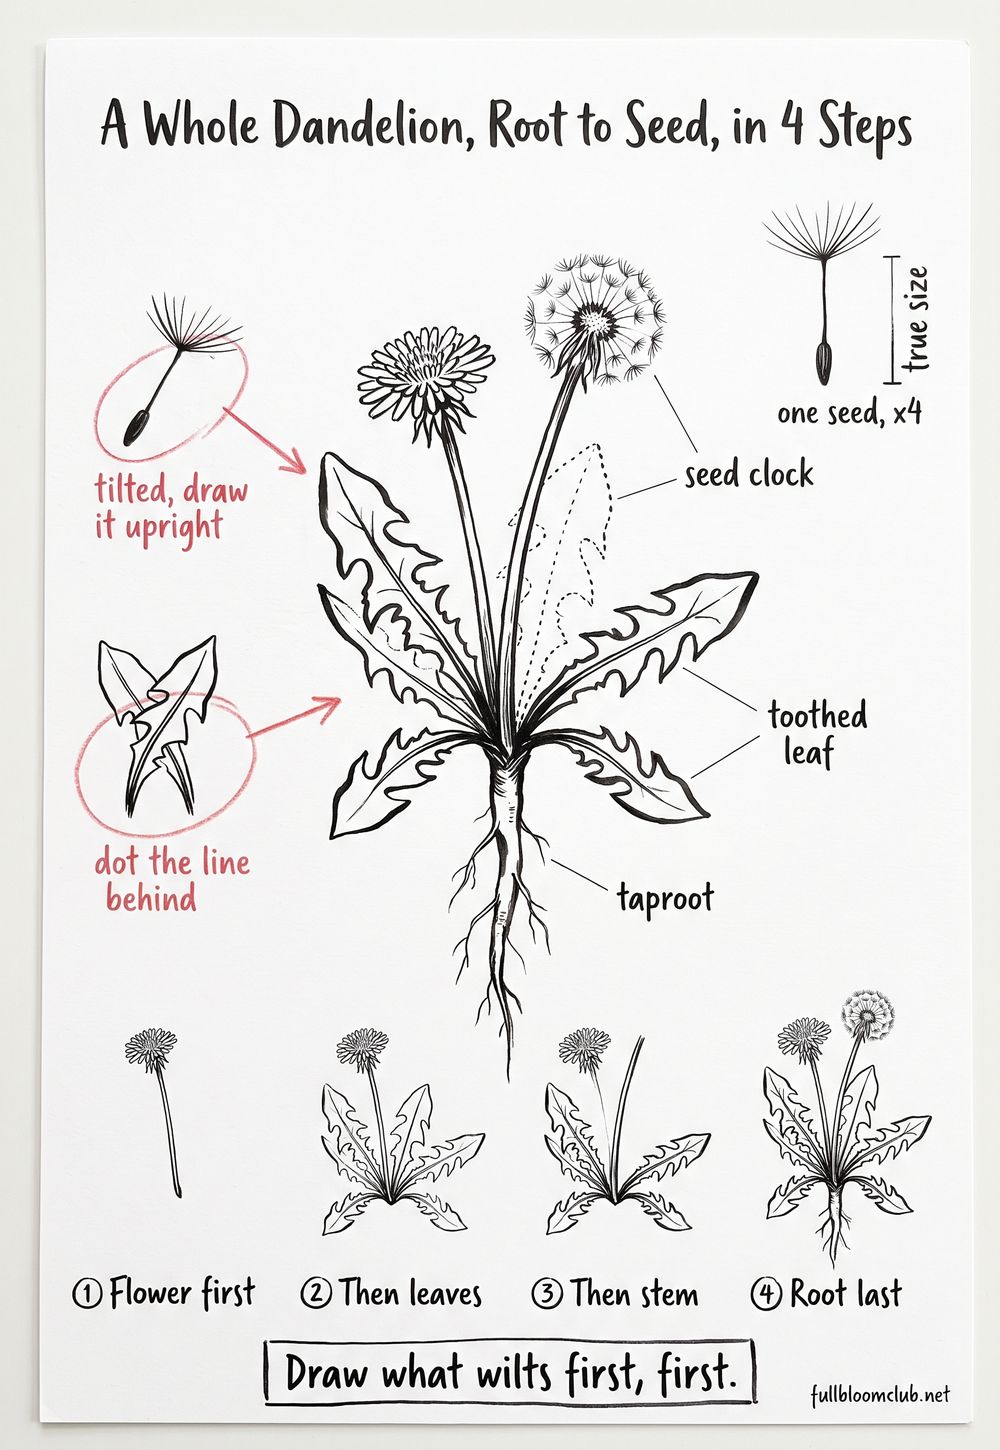
Below is that order, the four zones a sheet has to fill, and where the enlarged parts go. The free plate does all of it on one whole dandelion, so you can see it done before you try it tonight.
Download the free dandelion plate → Save
Print it at actual size. (Most print dialogs default to fitting the page. That setting is not your friend here.)
The plate is one whole dandelion, root to seed clock, its parts named on leader lines. Underneath, the same plant in 4 steps, flower first and root last.
In the corner sits one seed, upright at 4 times life, beside a bar for true size. That corner is the whole difference between botanical illustration and a drawing of a flower.
None of it is there to be tidy. Each part answers a question a stranger will ask about your plant.
The questions never change. Which plant is this. What do its small parts do. How big was it. Where did you find it.
Answer four questions and you have a record. Miss one and you have a nice drawing of something.
The red pencil marks my two favourite mistakes, a tilted seed and a leaf drawn solid where it should be dotted. An unfamiliar plant is still the hard part, and a plant already taken apart into steps is a different evening entirely.

The Collection
32 unfamiliar plants with the structure already found, and each one shows what to draw before the edges.
MODERN BOTANICAL ART. Pitchers, whiskers, and one flower shaped like a bat. For the evening an unfamiliar plant stops being intimidating. Inside: 32 plants, each one opened into its own steps, structure before finish. (A pitcher plant is mostly one long curve and a lid.) What you get: a plant you can finish in one sitting, and a folder of them by the weekend.
Back to the sheet, and to the order the work gets done in.
They drew the whole plant, roots and all, because half a plant proves nothing
A cut stem with a flower on it is a bouquet. It tells you almost nothing about the plant it came off.
So the convention was the whole thing. Root, stem, leaf, flower, seed, on one sheet, at the same scale.
Pull the plant up rather than cutting it. Wash the root under a tap and let it drip dry.
Roots are easier than they look. Draw the fat ones first and let the hairs follow them outward.

Where a plant is too big for the paper, the rule was not to shrink it. Draw one length of stem correctly and break the rest.
A break is two short parallel strokes across the stem. Everybody reads it. Nobody thinks you gave up.
I believed the whole plant meant the whole plant at any cost. I made some very small flowers.
They drew the parts that collapse first, first
Petals go soft before leaves. Leaves go soft before stems. Roots barely change all evening.
So the order runs inward from the thing with the shortest patience. Flower, then leaf, then stem, then root.
This is the opposite of how most of us draw. We outline first and save the details for when there is time.
In 1880 a painter called F. Edward Hulme wrote the same instruction down in a manual on flower painting in water colours. (The whole book is online.)
Do the most brilliant parts first, he says, while everything is in its purest condition. He means the brushes, the water, and your own appetite for the job.
He is blunt about what happens if you hedge. Beginners frightened of strong colour lay a tint too weak, then go back over it.
That is double labour, he writes, and it destroys the sharp precision of the outline.
Lay it at full strength once. Going over a thing twice is what blurs it.

(I tested this on a poppy, which is the plant least interested in waiting. The petals were gone inside an hour and the root had not changed at all.)
A botanical illustration started in pencil, and the pencil was meant to be changed
The pencil stage is not a rough version of the ink stage. It is a different job with a different rule.
In 1873 F. W. Burbidge published a short manual called The Art of Botanical Drawing, with his own engravings in it. (Scanned in full here.)
His pencil instruction is the most useful sentence I have found on this subject.
Faintly set down the general contour of the stem, the leaves and the flower head. Then leave ample space for the details and the analysis.
Then alter those faint lines until the drawing sits well on the paper.
Alter them. The faint lines exist to be moved. Most of us treat a first pencil line as a promise.
Then comes the part nobody prints. Draw the faint lines straight through each other, as though every stem were transparent.

When you commit, the line nearest your eye goes down continuous. The one behind it gets dotted where it passes underneath.
That is the whole trick of depth on a flat sheet. One continuous line, one broken line, and the leaf goes behind the stem with no shading at all.
Press lightly throughout. Every pencil line is going to be inked over, and a dark one reads through the ink like a bruise.
They put the small parts in a corner and drew them bigger than life
The corner of a plate is where the argument is won. It is called the analysis, and it is the part that names the plant.
A flower is opened, taken apart, and its pieces are drawn again much larger. Stamen, ovary, seed, a petal pulled off on its own.
This is the corner where botanical illustration stops being a picture and starts being evidence.
Burbidge gives three rules for it and all three are about the hand. Draw the enlarged parts upright, not tilted. Keep them in proportion to each other. Show where each part joins the next one.
The joins are the whole point. Two plants can look identical from across a room. Where the stamen meets the base of the flower is where they stop being identical.

Use a lens and look at one part at a time. Count things. Count the petals, count the stamens, then draw the number you counted.
(I once drew a flower carefully for an hour and left out the only part that named it. It was 4mm across and sitting behind everything else.)
Small parts drawn upright in a row also look deliberate. That is a pleasant side effect of a rule that exists for other reasons.
They made every botanical illustration say how big the plant really was
A drawing has no size. Enlarge a seed pod and it could be a melon.
So a sheet carries its own scale. It is the cheapest honest thing on the page.
Draw one part at natural size somewhere on the sheet, and say so. Everything enlarged is then measured against it.
The simplest version is a short bar with a measurement beside it. Drop it in the margin near the analysis corner.

Burbidge is firm that the enlarged parts must stay in proportion to one another. Judging that proportion is the tricky bit at first.
Practice fixes it, he says, which is the least comforting and most honest sentence in the book.
Do it the lazy way instead. Lay the real part on the paper, mark its two ends, and draw your natural-size version between the marks.
(I now do this with a strip of paper and no measuring at all. It has never let me down.)
They hung the label on the plant before a line was drawn
Almost nobody copies this piece, and it is the one that turns a drawing into a record.
In 1891 D. P. Penhallow, a botany professor in Montreal, wrote a collector’s manual describing exactly how a label travels. (His manual is scanned here.)
The label is an ordinary slip of white paper. Cut it twice in the middle so it forms a short loop. Slip the loop over a leaf or some other prominent part of the plant.
It stays on the plant. It goes through every stage with it, right up to the moment the specimen is mounted on its sheet.

On it goes the name, the date, the place, and who collected it. Penhallow wants plants named as they go into the press, or as soon after as possible.
His reason is entirely practical. Hurry plants into the press unnamed and they pile up. Then somebody else names them, or nobody does.
Nothing must be left to chance, he writes. That sounds stern until you have lost track of which sheet came from which hedge.
A botanical illustration with no label is a picture. Cut a slip tonight before you sharpen anything. Write the date and where you picked it.
(My handwriting on these is appalling and it has still never mattered.)
Free Starter Pack
Get 10 free pattern templates for the leaf blades, once the outline is settled.
Sent tonight. Small fills for the broad areas, after the structure is down.
Unsubscribe in 1 click, no hard feelings
Those fills are for the broad areas, once the structure underneath has stopped moving.
A botanical illustration was drawn the right way round, and the stone took it off the paper
Here is the part of this history I enjoy most, because the problem is so undignified.
Printing a plate meant putting the drawing onto a lithographic stone. The stone prints in reverse. So the artist had to draw everything backwards.
Every letter, every curling leaf, every label, mirrored, by hand, correctly, first time.
In 1872 a London printer named D. G. Berri published a short account of the trade. (His account is online.)
To get round the great difficulty of writing backwards on the stone, he says, transfer paper was invented soon afterwards.
You draw the right way round on a sheet of prepared paper. The paper is laid face down on the stone and gives the drawing up to it.

An entire craft added a second invention because writing backwards was too much to ask of anybody.
When the method is fighting your hand, the method is usually wrong.
I think about that whenever a drawing feels harder than it should.
How to start a botanical illustration tonight with the free dandelion plate
Go outside and pull up one small whole plant. Something common, with a root you can wash.
Print the dandelion plate at actual size and keep it beside you. Cut a label slip, loop it over a leaf, and write the date.
Work the order. Flower first, then leaves, then stem, then root. Faint pencil all the way, lines drawn through each other.
Fix the faint lines until it sits on the paper. Then ink the near edges continuous and dot the far ones.
Open a second flower and fill the corner. Upright, enlarged, in proportion, joins showing.
Put one part in at natural size and mark the bar. That is a record, and it took an evening. If you want the plainer way in first, the beginner’s guide to botanical art stays on the flower alone.
(Mine took two, because I washed the root for far longer than any root has ever needed.)
Do it again next week with a plant that looks nothing like the first. The order stops being a list you follow.
32 plants opened into steps before a single edge is drawn


Pick one you cannot name. Draw its structure before you draw its edges, exactly as the sheet sets it out. Then finish it. Do it again the next night with a plant that is nothing like it. Two evenings in, unfamiliar stops meaning difficult.
Open the Modern Botanical Art Collection →
Instant download · print as often as you like
A plant you have drawn properly stays drawn. The one on the table will soften by morning. The sheet will still be there, corner full of small upright parts, ready to explain itself to anybody who asks.
“All the parts will lie naturally behind each other.”
F. W. Burbidge, The Art of Botanical Drawing, 1873
Mirabelle wrote this. No training, strong opinions, many pens. Peer reviewed by a cat who inspected the root ball and declared the soil the best part.