A pattern is a set of instructions the last mark left for the next one. Slow drawing patterns are not calm patterns drawn slowly.
That is a rate, not a mood. A rate can be measured. A mood cannot. It is why slow drawing patterns survive an evening that keeps interrupting you.
Put down one mark. The next one now has orders. It knows where to land, which way to face, and how big it is allowed to be.
So there is nothing to rush toward. You cannot skip to the good part, because the good part has not been built yet.
(I have tried to hurry one. The page tells on you within about 4 marks.)
Below: how the relay works, then 33 slow drawing patterns sorted by what the last mark hands over.
The mandala sheet is first.
Download the free 7 move mandala sheet →

Print it at actual size, not fit to page. (Your printer will campaign for fit to page. Ignore it.)
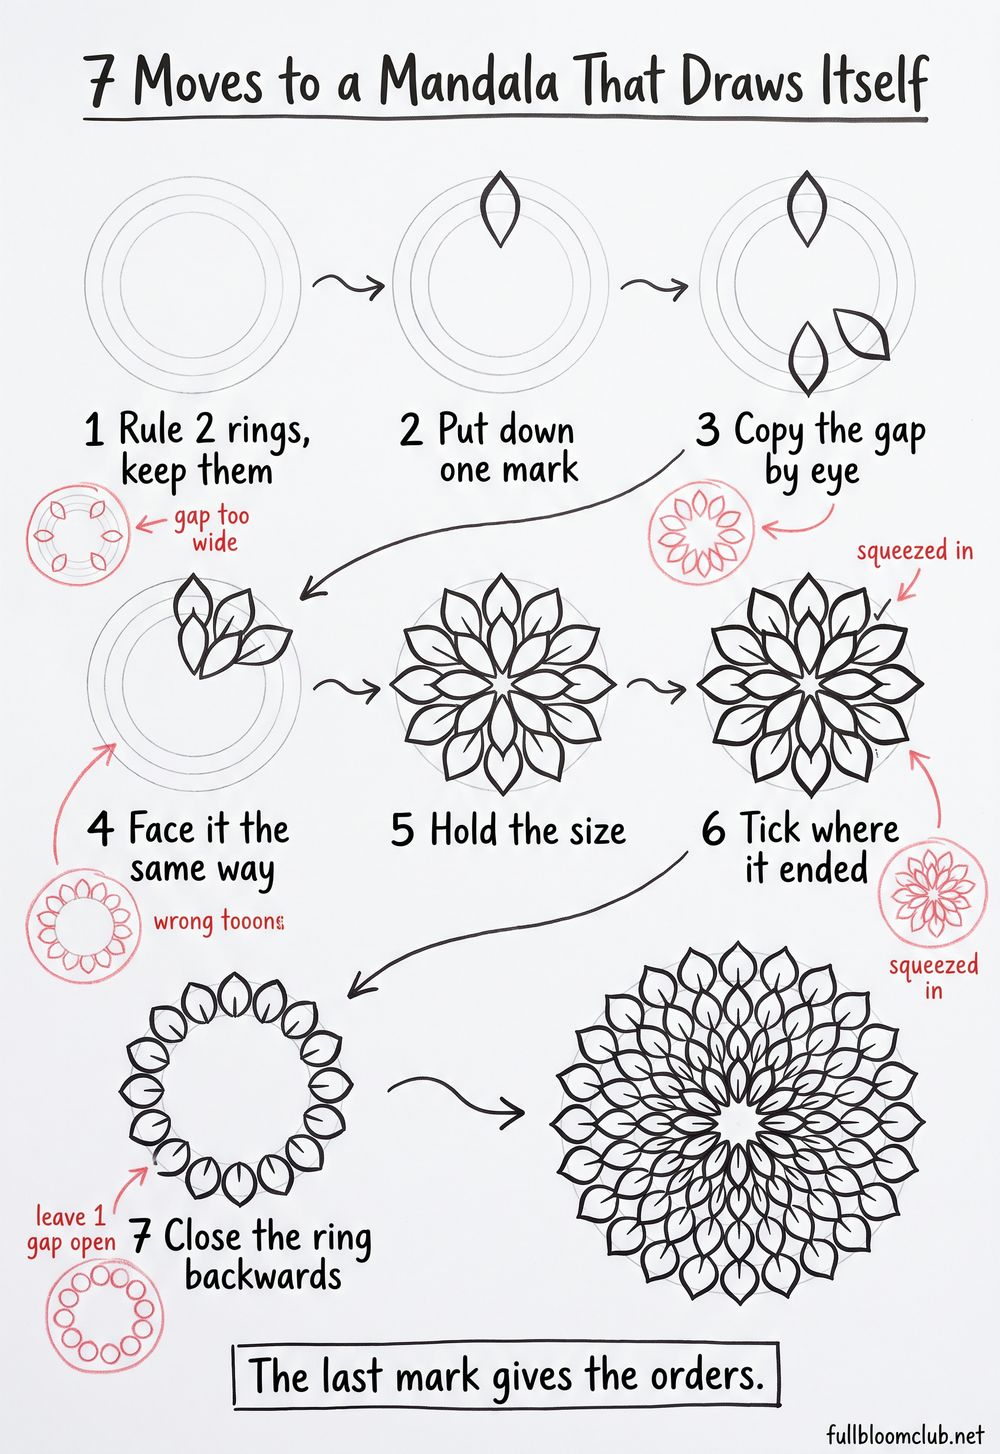
The sheet is one mandala built in 7 moves, joined by arrows, so you can watch every handover happen.
Nothing on it asks you to invent. Each move only asks you to continue the last one, which is a far kinder question at 9pm.
Rule 2 rings, put down one mark, and let that mark decide the gap, the direction and the size of the next.
That is the whole exercise. It sounds small. It is the entire skill.
Beside the moves sit 3 classic mistakes in red pencil. Gaps too wide, a squeezed last petal, every shape sealed shut. I have made all 3, in that order.
The first ring teaches your hand the gap. The second one is always tidier.
Do not finish the mandala in one sitting if you do not want to. A ruled ring keeps your place perfectly well without you.
Put the sheet somewhere you will pass it. Slow drawing patterns get done in passing, 4 units at a time, not in one heroic evening.
If a unit goes wrong, leave it. It becomes the break in the repeat, and I will come back to why that helps.

The Collection
30 daily sheets, and the last mark has already decided the next one.
ZEN DOODLE MASTERY. Bands, fills, and one shape that keeps its word. For the evening when you want the page to do the deciding. Inside: 30 daily sheets, each handing your pen a unit and a band to run it in. (I reach for these when I cannot be trusted to choose.) What you get: a page that reads as deliberate, and units you will still use in a year.
So the rest of this is the relay itself, one handover at a time.
A cutter in the late 1600s put 6 sheets under one knife
The oldest version of this idea is a stencil, and the stencil is where the rate becomes physical.
Japanese dyeing stencils are cut from thin paper bonded with persimmon glue. Andrew Tuer wrote the cutting down in 1893.
His cutter does not take one sheet. He takes “some half-dozen sheets of tough paper made of mulberry fibre”. He clamps them and cuts the lot at once.
Think about what that does to the hand. Every stroke is 6 stencils. A wandering line does not spoil a sheet. It spoils the stack.
For the dots, the knife is put down entirely. Tuer is precise about why. The punch replaces the knife, “for if pins were used a bur would be formed”.
A pin is faster and leaves a raised lip. The punch is slower and leaves a clean hole. The craft chose the slower tool on purpose.
(I think about that whenever I reach for the quick way round something.)
Tuer credits the method to “a dyer, named Someya Yuzen, towards the latter part of the seventeenth century”.
For your hand tonight: work on 2 bands at once, not one. Draw the same unit across both before you move on.
You will slow down immediately. You will also stop fiddling with the first band, which is what ruins it.

Slow drawing patterns need a bridge or the page falls apart
A stencil has a rule that drawing does not, and borrowing it fixes the most common mess on a page.
Cut a ring out of paper and the middle falls out. So the cutter leaves a thin strip of paper joining the middle to the edge.
The trade calls those islands and bridges. An island is the bit inside the hole. A bridge is the strip that holds it there.
The reference statement is plain: the islands are connected “to other parts of the stencil with bridges”.
On paper, the bridge is a line you deliberately do not close. You leave the shape attached to its neighbour.
The cutters went further than paper bridges. They laid a fine silk net over the whole stencil to hold the loose parts still.
Nakajima Hidekichi, 1883 to 1968, is one of the named carvers of these stencils. Silk replaced human hair for that net, because silk is less likely to warp and can be finer.
Most busy pages are busy because every shape was sealed shut. Sealed shapes have no relationship. They just crowd.
(My old pages were 30 closed circles in a row, all minding their own business, none of them speaking.)
Tonight: leave 1 gap in every closed shape you draw. One. Put it where the next shape is coming from.

Every mark is a set of instructions for the next one
Here is the relay stated flat, because everything below runs on it.
A mark hands over 3 things. Where the next one lands. Which way it faces. How big it is.
A slow pattern is not a calm one. It is one where the next mark cannot be chosen yet.
That is it. Nothing else transfers, and nothing else needs to.
Spacing first. Measure the gap you just left, and repeat that gap. Do not measure with a ruler. Measure by eye, against the last one.
Direction second. If the last unit leaned right, the next either matches it or answers it. Matching makes a run. Answering makes a wave.
Size third. Keep it, grow it, or shrink it. Pick one and hold it for the whole band.
(The moment I mix all 3 in one row, the row stops looking like anything.)
The test is brutal and quick. Cover the last unit with your thumb. If you still know what comes next, you are drawing from a plan, not a relay.
The pins that put each print exactly where the last one stopped
The relay is not only a drawing habit. Industry built machines to enforce it, because by hand it drifts.
Block-printed cloth is stamped one block at a time. The block carries pins at its corners.
The description is exact. The pins fall on the marks left by “the previous impression”. When they do, “the two printings join up exactly”.
Read that again as a drawing instruction. You do not place the next unit on the paper. You place it on the last unit.
The printer strikes the block with a wooden mallet. Then he lifts it. Then he locates off the mark just made. Then again. All day.
Christophe-Philippe Oberkampf, 1738 to 1815, trained as an engraver at Mulhouse before he ran the Jouy printworks. His first fabrics were printed in May 1760.
He had 900 workers by 1774. The pins did not get cleverer. They just got used more often.
(An entire industry, and its whole accuracy rests on 4 pins and the willingness to look down before pressing.)
Your version costs nothing. Put a pencil tick where the last unit ended. Start the next one at the tick, not near it.

Where slow drawing patterns go wrong is the gap, not the shape
Nobody has ever looked at a page and thought the little leaves were the problem.
The shapes are almost always fine. The gaps between them are what reads as untidy.
A gap has 2 jobs. It has to match the last gap. It also has to be smaller than the unit beside it.
Nobody has ever blamed the shapes. It is always the gaps.
Get the second one wrong and the row reads as scattered. Get the first one wrong and it reads as nervous.
So gauge the gap with the unit itself. Draw the unit, then leave less space than the unit is wide. Then the next unit.
(I spent about a year blaming my wobbling hand. My hand does wobble. The gaps were doing the damage.)
If a band has already gone wrong, do not redraw it. Thicken every unit slightly until the gaps look deliberate.
That is a repair nobody can see, and it works because the eye only ever compares.

Free Starter Pack
10 pattern templates, free
Units to run inside the bands you ruled tonight. Sent with a starter pack.
Unsubscribe in 1 click, no hard feelings
A gap you can gauge is a gap you can repeat. Which brings us to the part everyone skips.
A pattern book from the late 1400s shows the working lines, not the finished page
Somebody worked all this out long before it reached a drawing blog, and then drew the working out.
The Topkapı Scroll is a pattern book of geometric designs from the late 15th century.
Most pattern books show you the result. This one does not. Its drawings show “the girih lines superimposed on the tiles used to generate the pattern, making the construction fully evident”.
The scaffolding is left in. You can see what decided what.
Leave the ruled lines in. The page looks better with its bones showing.
The pattern reached a wall by template. That template is “pricked through on to the surface to be decorated”. Pricked. Hole by hole.
(A book that shows its own workings is rarer than it sounds, then and now.)
What it means for your hand: rule your guide lines in pencil and then leave them there.
Erasing the construction is the last nervous act of somebody who wants the page to look effortless. The page looks better with the bones in.

The 33 slow drawing patterns, sorted by what the last mark decides
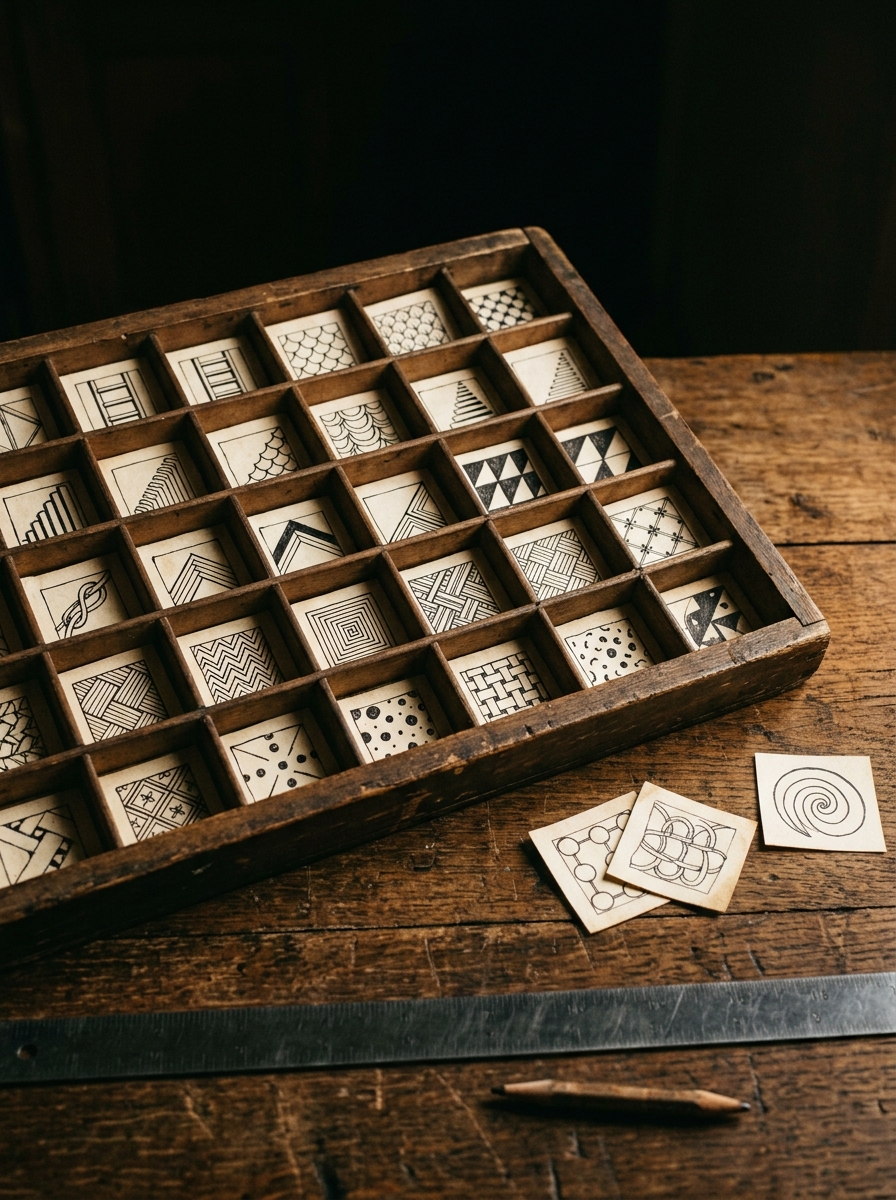
These are units, not pictures. Each one names what it hands to the next unit. Run any of these slow drawing patterns along a ruled band.
(I have drawn all 33 more often than is reasonable. The last 6 are still the ones I get wrong.)
Where the next mark lands, and the gap is the whole instruction. The ladder rung is the plainest of all, and the gap must stay narrower than the rung is long. The leaning comb tilts every rung the same few degrees, so the tilt is what you copy, not the rung.
The counted notch cuts a short nick into a ruled line. Run 3 nicks, then a space. The split rung puts a shorter stroke under each rung. It sits on the same side every time. The offset tick drops every second mark half a step down, which turns a row into a rhythm.
The crowding rule shortens the gap gradually along the band, so the row appears to gather speed. The breathing gap opens by a hair each time. It is the hardest of the 7 to hold.
Which way the next mark faces, where direction is the handover. The turning scale is an arc that sits in the dip of the arc before it. The answering arc flips to face the other way, so the pair makes a lens between them. The nested crescent sits inside the last one. The gap between the 2 curves is all anyone sees.
The reversing wave runs 3 units one way then 3 the other, and the turn must land mid-unit. The swung bracket leans hard, so the next bracket has to lean the same or the band looks dropped. The tipping vane rotates each unit by a fixed small turn and arrives somewhere unexpected after 12 of them.
The folded fan opens the angle as it travels, which only works along a curve.

How big the next mark is, where scale is the handover. The tapering pile shrinks each unit by a set amount, and setting the amount is the work. The swelling bead does the reverse and needs a firm stop before it becomes a blob. The shrinking stair steps down in size and position together, so it travels diagonally.
The doubling block draws the next unit at twice the last, and it can only survive 3 steps. The halving square is that in reverse and survives about 4. The widening plait grows a braid across a band, and the crossings must stay evenly spaced while the width changes.
What the last mark left empty, where the gap becomes the subject. The filled corner inks the wedge left between 2 curves. The spared centre leaves the middle of every unit white while everything round it fills. The inked triangle blacks in alternate gaps. It is the fastest way to finish a band.
The hollow between outlines the empty space and then leaves it alone. The pinched waist narrows the gap at the middle of each unit, so the row reads as a chain. The crowded shoulder fills only the upper gap, which makes the whole band lean. The empty spine keeps a clear channel running the length of a filled band, and the channel must never wander.
Where it has to stop, because the edge decides the last mark. The mitre that agrees turns the band at 45 degrees, and both sides must arrive at the corner in step. The short last unit is deliberately clipped where the band runs out, and it is more honest than squeezing.
The swallowed end runs the band under another band and simply stops. The turned corner band rotates the unit a quarter turn at the corner, so the corner becomes a feature. The closing knot ties 2 band ends together with 1 crossing. The honest stop ends the row before the edge and leaves the margin empty. It is the hardest instruction here.

A corner is where slow drawing patterns either work or confess
Everything in this article arrives at a corner eventually, and the corner is not decided by you.
It is decided by how the band has been running for the last 20 units.
So the corner has to be planned backwards. Rule your corner first. Then work back along the band to your starting point.
That is why the stencil cutter clamps 6 sheets and the printer looks down at 4 pins. Both are refusing to find out at the end.
(I have met a lot of corners with 2 thirds of a unit left. I had opinions.)
If the band will not fit, change the gap, never the unit. The gap is invisible. The unit is what she sees.

What makes a pattern slow rather than just small
A small pattern is one with tiny marks. A slow pattern is one where the next mark cannot be chosen yet.
You can draw a small pattern fast and it will look fine, just thin.
Slow drawing patterns resist a distracted evening, which is the real reason they work when other ideas fail.
You put the pen down at a unit boundary. You come back. The last unit is still holding the instructions.
Nothing was lost, because nothing was being held in your head.
(That is the part I actually came for. The page remembers so I do not have to.)
How long one band takes, and what to do with half an hour
A ruled band of 30 units takes me about 25 minutes, unhurried, with the radio on.
Ruling the 2 guide lines takes under 1 minute and saves roughly 10.
Half an hour: rule the margin, then 1 band. Pick 2 units and run them alternately.
If you have 10 minutes: 1 band, 1 unit, no corner. Stop at the edge and leave it.
The band does not care when you come back to it. It is holding its place either way.
30 sheets that hand you the unit and the band to run it in


Rule the 2 lines, then run the unit until the band is full. Every sheet names its unit and marks where the row should stop. The deciding is finished before the pen arrives. I keep them for evenings when I want to draw and not choose.
Instant download · print as often as you like
A band fills the way a queue moves. Each one waits for the one in front, and the whole thing arrives somewhere anyway. Rule 2 lines, make one mark, and let it give the orders. The paper is extremely patient about this and has never once asked how long you took.
“The threads are so fine that the stencil brush ignores them.”
Andrew W. Tuer, The Book of Delightful and Strange Designs, 1893
Mirabelle wrote this. No training, strong opinions, many pens. Peer reviewed by a cat who waited for the corner and left before it resolved.
—