Picture this: It’s a crisp October evening, and I’m sitting at my desk, surrounded by the warm glow of candlelight. The scent of pumpkin spice wafts through the air, and my trusty sketchbook lies open before me. As I pick up my pencil, I can’t help but feel a delightful shiver of anticipation. You see, I’m about to embark on a spooktacular journey through the realm of Halloween doodles, and I’m inviting you, my fellow art adventurer, to join me!
Now, I know what you might be thinking. “Halloween doodles? Aren’t those just for kids?” Oh, how wrong you’d be! As someone who once believed stick figures were the pinnacle of my artistic prowess, I can assure you that these Halloween doodles are not only incredibly fun but also surprisingly easy to master. So, grab your favorite beverage (might I suggest a steaming mug of witch’s brew… or just regular coffee), and let’s dive into the wonderfully wacky world of Halloween art!

The Great Pumpkin Parade: Doodling Jack-o’-Lanterns
Our first stop on this ghoulish adventure is none other than the iconic jack-o’-lantern. Now, I’ll let you in on a little secret: my first attempt at drawing a pumpkin looked more like a deranged orange blob than anything remotely Halloween-esque. But fear not! With a few simple tricks, you’ll be carving out perfect pumpkins on paper in no time.
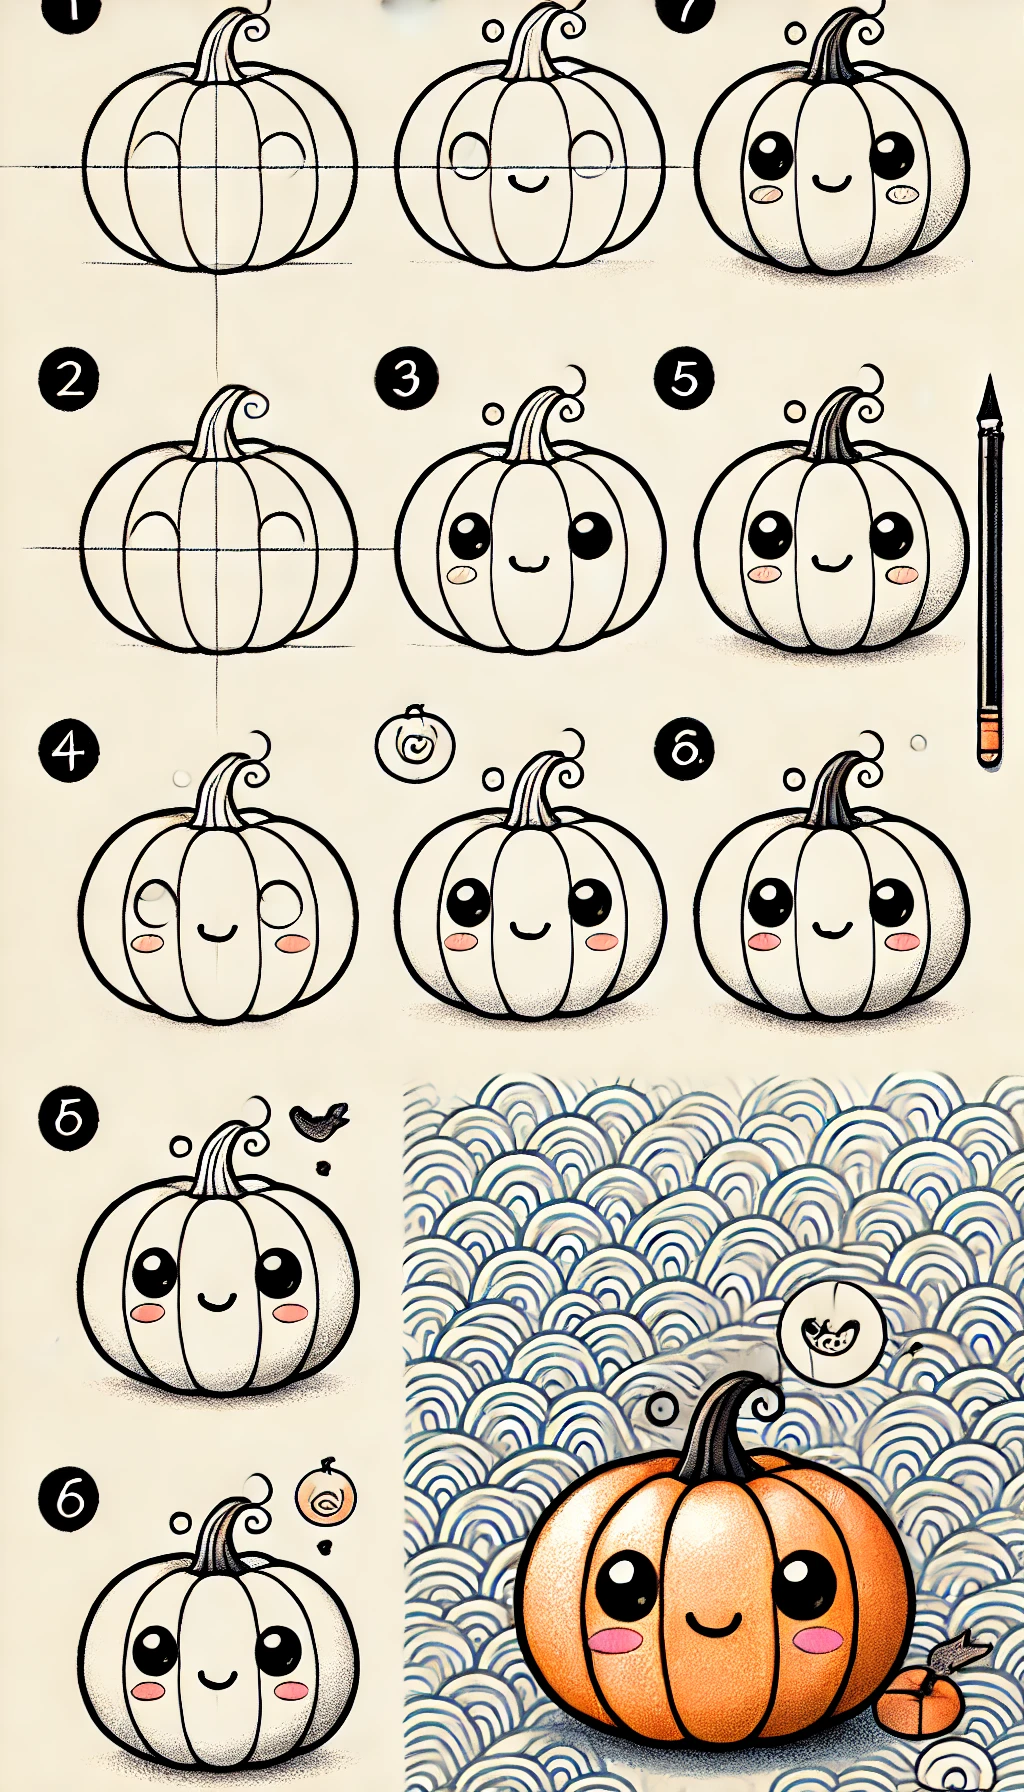
Jack-o’-Lantern Doodle Guide:
- Start with a simple circle (or oval if you’re feeling fancy).
- Add a stem at the top – think of it as the pumpkin’s jaunty little hat.
- Now for the face: triangles for eyes, a triangle or crescent for the nose, and a jagged mouth.
- For extra flair, add some curved lines on the pumpkin’s body to give it that signature ridged look.
Pro Tip:
Experiment with different facial expressions. A toothy grin can make your pumpkin look friendly, while slanted eyebrows can give it a more sinister appearance. The possibilities are endless!
As I practiced my pumpkin doodles, I found myself getting more and more creative. Soon, I had an entire patch of paper pumpkins, each with its own unique personality. It was like hosting a quirky Halloween party right there on my sketchpad!
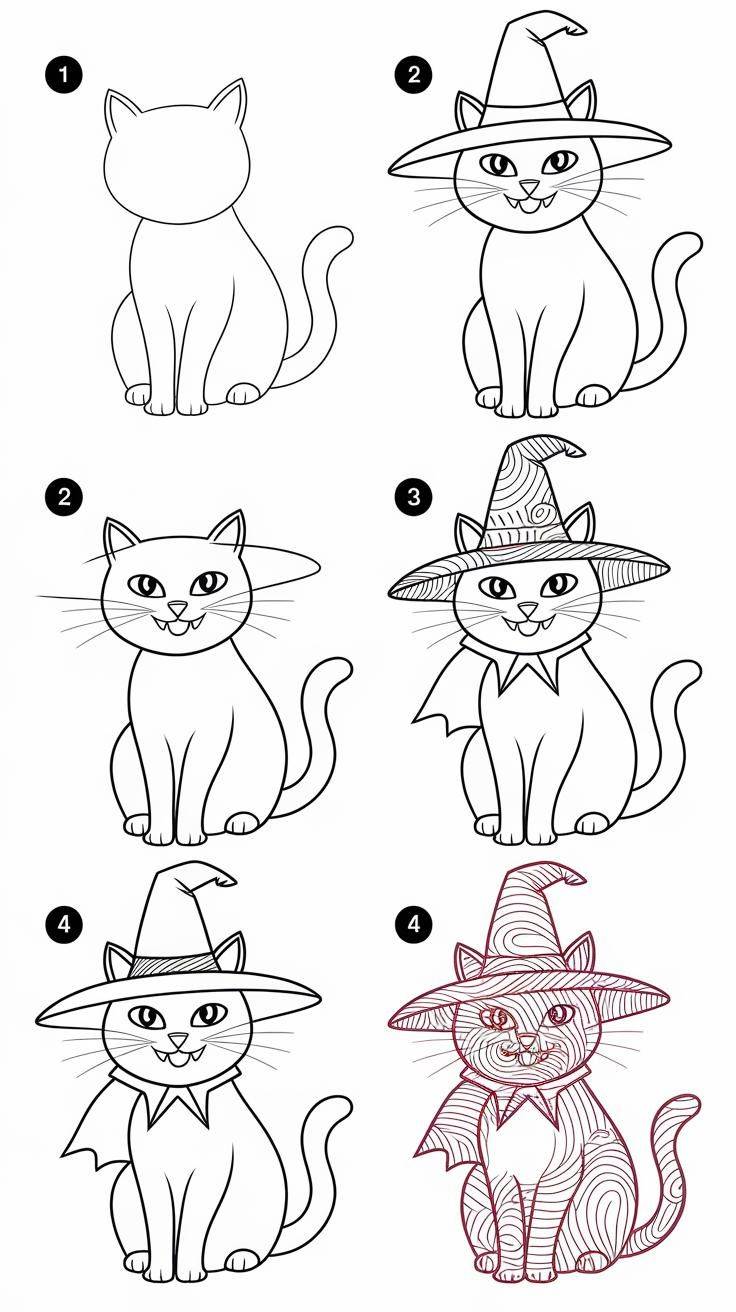
Witch Way to the Cauldron? Brewing Up Some Magical Doodles
Next up on our spooky sojourn: witches! Now, don’t be scared off by the thought of drawing an entire person. We’re going to start with something much simpler – a witch’s hat. Trust me, it’s easier than brewing a love potion (not that I’ve tried, of course).
Witch’s Hat Doodle Guide:
- Draw a wide triangle for the base of the hat.
- Add a curved line at the bottom for the brim.
- Draw a buckle or a band around the hat for extra detail.
- For a touch of whimsy, make the point of the hat slightly curved.
Once you’ve mastered the hat, why not try adding a cauldron beneath it? A simple upside-down U shape with a few bubbles rising from it will do the trick. Before you know it, you’ll have a whole coven of witch hats and bubbling brews decorating your page!
Aha Moment:
I discovered that adding little stars or sparkles around the witch’s hat instantly gave it a magical feel. It’s amazing how such a small detail can bring your doodle to life!
As I filled my page with pointy hats and bubbly cauldrons, I couldn’t help but chuckle at how these simple shapes were transforming into a whimsical witchy scene. It was like watching a magic spell unfold right before my eyes – minus the risk of accidentally turning myself into a toad!
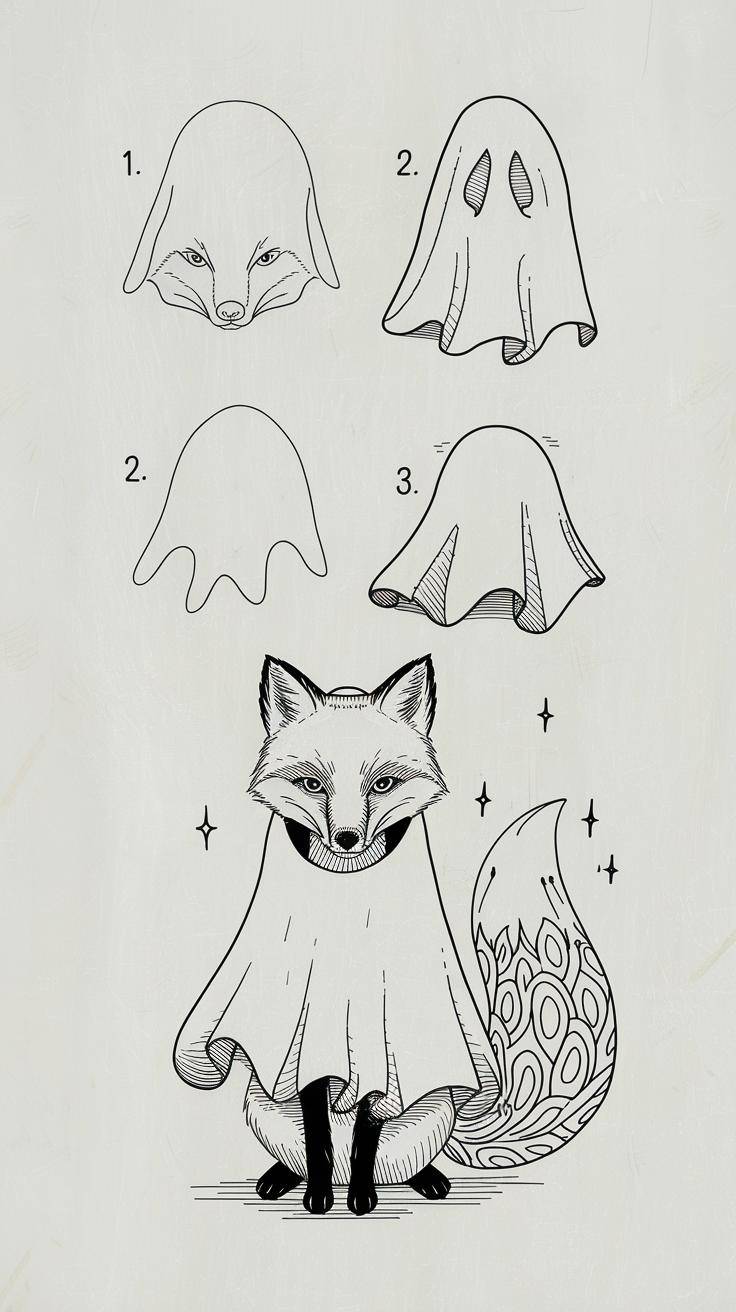
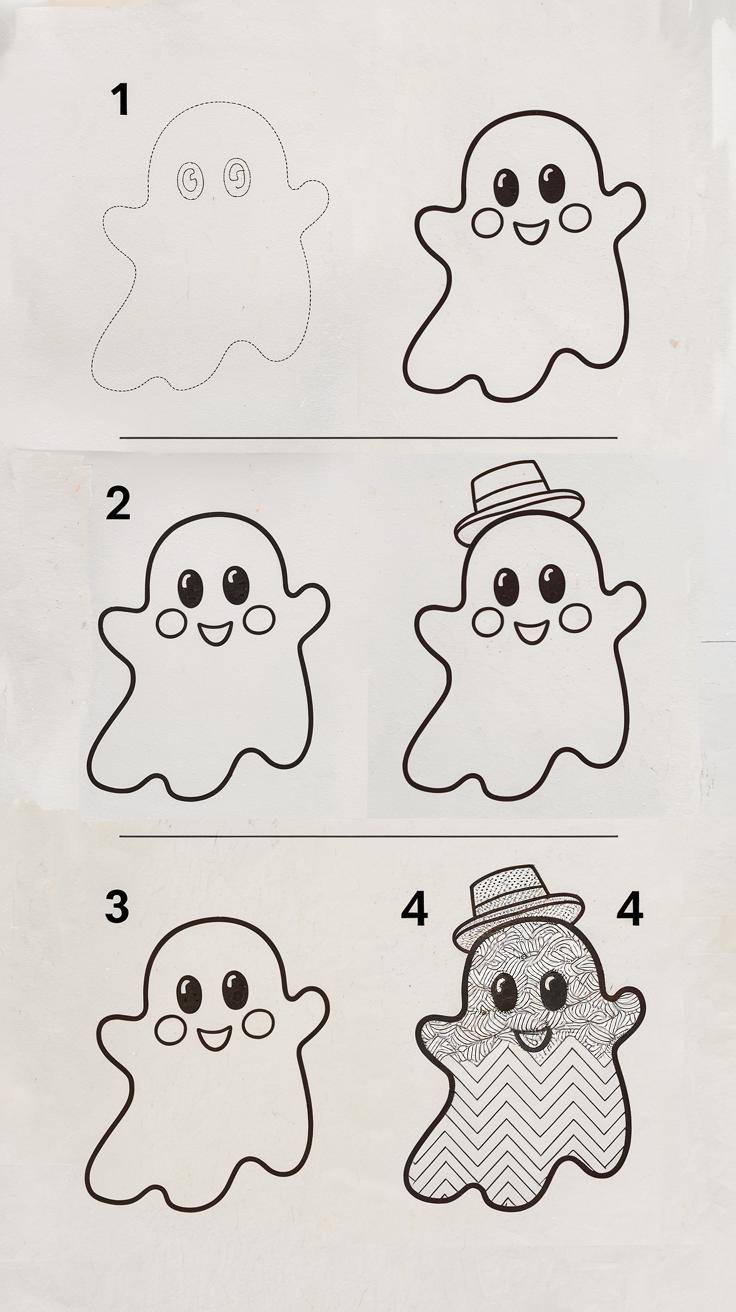
Ghost Stories: Doodling the Friendliest Phantoms
Now, let’s float on over to one of the simplest yet most iconic Halloween symbols: the ghost. When I first tried drawing a ghost, I was worried it would look like a sad, deflated balloon. But fear not, my spectral sketching friends! With a few easy steps, you’ll be conjuring up the cutest (or creepiest) ghosts this side of the graveyard.
Ghost Doodle Guide:
- Start with an upside-down U shape for the body.
- Add a wavy line at the bottom for that classic ghostly trail.
- Pop in two circles for eyes.
- Finish with a mouth – a simple O for a spooky “Boo!” or a curved line for a friendly smile.
Expert Insight:
“The key to a great ghost doodle is in the eyes,” says renowned spectral artist Casper McFriendly. “Make them big and expressive, and your ghost will come to life… so to speak!”
As I practiced my ghost doodles, I found myself creating an entire phantasmal family. There was the mama ghost with her pearl necklace, the papa ghost with his dapper bow tie, and even a baby ghost complete with a tiny rattle. It was like hosting a ghostly reunion right there on my sketchpad!
Web of Intrigue: Spinning Spooky Spider Doodles
Now, I know what you’re thinking. “Spiders? No way! Those eight-legged creepy crawlies are too complicated to draw!” But hold onto your witch’s hat, because I’m about to show you how easy it is to sketch these arachnid amigos.
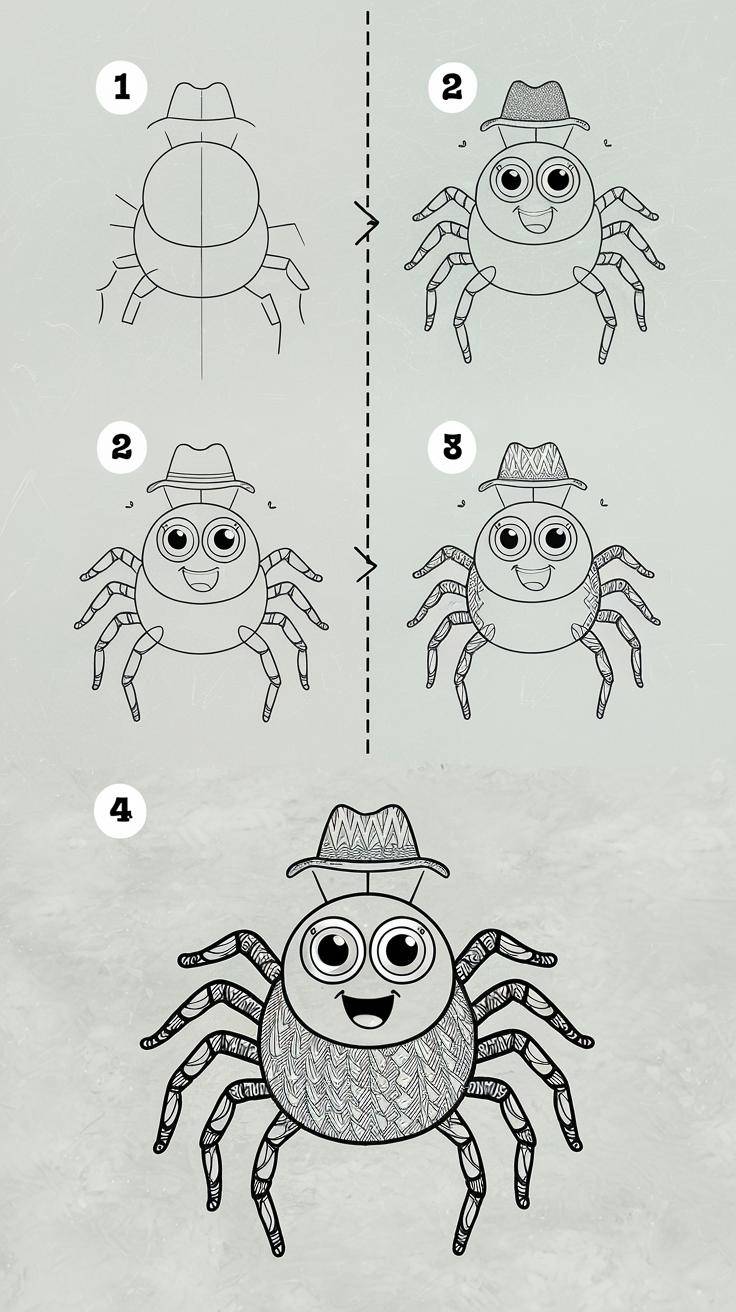
Spider Doodle Guide:
- Draw a circle for the body.
- Add a smaller circle for the head.
- Draw four curved lines on each side for the legs.
- Pop in two dots for eyes.
Pro Tip:
Want to make your spider extra cute? Give it a little top hat or a bow tie. Who says spiders can’t be dapper?
As I filled my page with an array of eight-legged friends, I couldn’t help but laugh at how these once-feared creatures were now looking positively adorable. I even named a few – there was Spidney, the sophisticated spider with a monocle, and Charlotte, the web-spinning wonder with a flair for geometric designs.
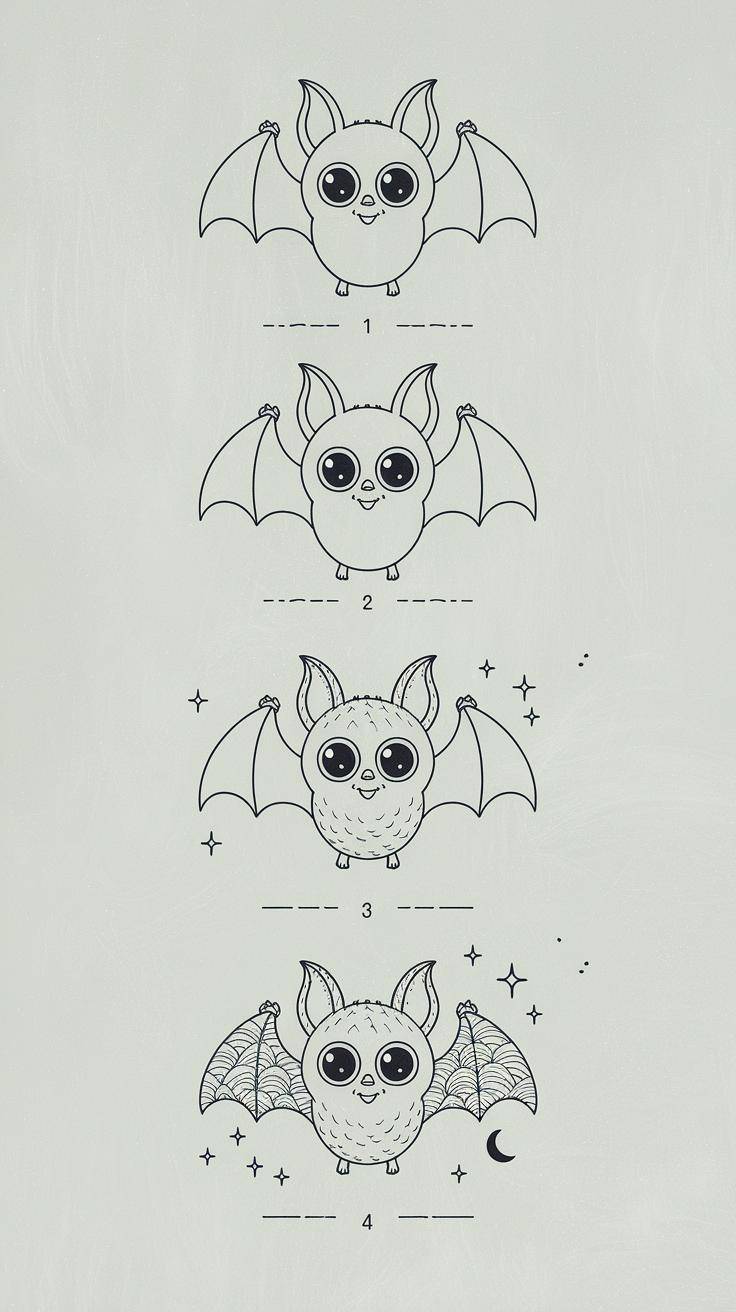
Batty for Bats: Fluttering into the World of Winged Doodles
Next on our Halloween hit parade: bats! Now, I’ll admit, when I first thought about drawing bats, I was a bit… well, batty with nerves. But fear not, my nocturnal navigators! These flying friends are surprisingly simple to sketch.
Bat Doodle Guide:
- Start with a small oval for the body.
- Add two triangular wings on either side.
- Draw two tiny triangles for ears on top of the body.
- Finish with two small dots for eyes.
Fun Fact:
Did you know that bats are the only mammals capable of true flight? Now that’s something to sink your fangs into!
As I practiced my bat doodles, I found myself creating an entire colony. There was Bruce the bodybuilder bat, flexing his impressive wings, and Barbara the bookworm bat, clutching a tiny tome in her claws. Before I knew it, my sketchpad had transformed into a veritable bat cave of creativity!
Skull-duggery: Sketching Not-So-Scary Skulls
Now, don’t lose your head, but our next doodle subject is skulls! I know, I know, skulls might seem a bit macabre, but trust me, we’re going to make these bony beauties more charming than creepy.
Skull Doodle Guide:
- Draw a large circle for the cranium.
- Add a smaller, upside-down heart shape below for the jaw.
- Draw two large ovals for the eye sockets.
- Finish with an upside-down heart for the nose cavity and a few lines for teeth.
Reader Challenge:
Try giving your skull a fun accessory like a flower crown or a pirate eye patch. Who says the afterlife can’t be stylish?
As I filled my page with an assortment of skull doodles, each one seemed to take on a personality of its own. There was Skully the Sophisticated, sporting a dapper top hat and monocle, and Bonita the Beautiful, adorned with a garland of daisies. It was like hosting a Day of the Dead celebration right there on my sketchpad!
Mummy Dearest: Unwrapping the Art of Bandaged Buddies
Our next stop on this haunted hayride of Halloween doodles is the mummy. Now, I know what you’re thinking – all those bandages must be a nightmare to draw! But hold onto your sarcophagus, because I’m about to show you how to unwrap the mystery of mummy doodling.
Mummy Doodle Guide:
- Start with a simple stick figure.
- Add horizontal lines across the body for bandages.
- Draw a few loose ends of bandages here and there.
- Finish with two round eyes peeking out from the bandages.
Pro Tip:
Want to give your mummy some extra character? Try drawing one bandage trailing behind it, as if it’s just starting to unravel. It’s the mummy equivalent of trailing toilet paper on your shoe!
As I practiced my mummy doodles, I found myself creating an entire cast of wrapped-up characters. There was Tutankhamummy, the regal pharaoh with a slightly crooked crown, and Cleopatra Wrap-ture, sporting a chic bob haircut (yes, even mummies can have good hair days). Before I knew it, my sketchpad had turned into a veritable Valley of the Kings!
Frankenstein’s Monster Mash: Creating Lovable Laboratory Creations
Last but certainly not least on our Halloween doodle parade is Frankenstein’s monster. Now, don’t bolt at the thought of drawing this complex character – we’re going to break it down into simple, easy-to-manage parts.
Frankenstein’s Monster Doodle Guide:
- Draw a large rectangle for the head.
- Add a smaller rectangle below for the neck.
- Draw two bolts sticking out from the sides of the neck.
- Add a flat top to the head and a prominent brow.
- Finish with two small eyes, a nose, and a mouth with a few teeth showing.
Aha Moment:
I discovered that changing the shape of the mouth can completely alter the monster’s expression. A straight line makes him look serious, while a slight curve can make him appear friendly or even confused. It’s amazing how such a small detail can bring your creation to life!
As I filled my page with an assortment of Frankenstein’s monster doodles, each one seemed to take on a life of its own (pun absolutely intended). There was Frank the Friendly, with his lopsided smile and heart-shaped chest patch, and Igor the Intellectual, sporting a tiny pair of spectacles and clutching a miniature book. It was like hosting a mad scientist’s convention right there on my sketchpad!
The Grand Finale: Putting It All Together
Now that we’ve mastered all these spooktacular doodles, it’s time for the pièce de résistance – combining them all into one epic Halloween scene! Imagine a haunted house filled with your ghostly creations, a witch flying over a pumpkin patch, bats circling a grinning moon, and a mummy and Frankenstein’s monster having a friendly chat by a bubbling cauldron.
As I sat back and admired my completed Halloween masterpiece, I couldn’t help but feel a sense of pride and accomplishment. From someone who once thought drawing was beyond their capabilities, I had transformed into a veritable Vincent van Ghostly!
Your Turn:
Now it’s time for you to create your own Halloween doodle extravaganza! Don’t worry about perfection – remember, in the world of spooky sketches, wonky lines and imperfect shapes only add to the charm.
And here’s a little secret for you, my fellow art adventurer: If you’re looking to take your Halloween doodling to the next level, why not check out this bestselling resource? It’s packed with tips and tricks to help you become a zen doodle pro in just 30 days. Trust me, it’s scarier easy than you think!
As the candles flicker and the wind howls outside, I can’t help but smile at the journey we’ve taken together. From trembling beginnings to confident creations, we’ve laughed, we’ve learned, and we’ve brought a whole host of Halloween characters to life. So grab your pencil, let your imagination run wild, and remember – in the world of Halloween doodles, the only limit is your creativity (and maybe the size of your sketchpad).
Happy haunting, my artistic amigos!